
Ankle Support Secrets: How to Kinesio Tape Like a Pro
Why Learning Proper Ankle Taping Technique Matters

Learning how to kinesio tape an ankle can provide support and may help relieve pain from ankle sprains and instability. For a recent injury or chronic weakness, proper taping can help reduce pain and swelling while allowing natural movement.
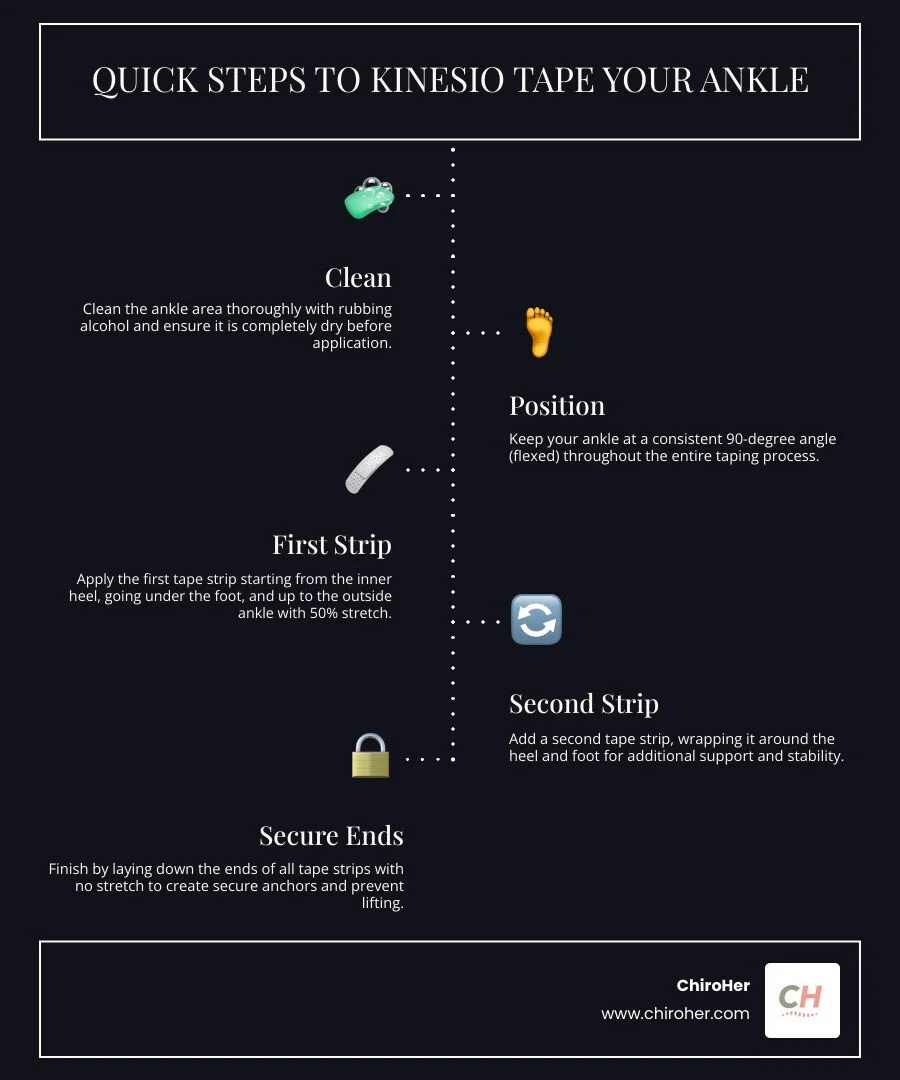
Quick Steps to Tape Your Ankle:
Clean the ankle with rubbing alcohol and let it dry.
Position your ankle at a 90-degree angle.
Apply the first strip from the inside of the heel, under the foot, and up to the outside ankle with a 50% stretch.
Add a second strip around the heel and foot for more support.
Finish by laying down the tape ends with no stretch to anchor them.
The tape's elastic structure creates small wrinkles in the skin, which can increase blood flow and lymphatic drainage. This lifting effect gives your ankle joint more room to move while providing a sense of stability.
Unlike rigid athletic tape, kinesiology tape allows your ankle to function naturally. The greatest benefits often occur within the first 24 hours, though the tape can stay on for 3-5 days and withstand showering.
I'm Dr. Michelle Andrews, and through my work with athletes at ChiroHer, I've seen how proper technique makes the difference between effective support and wasted tape. My experience treating ankle injuries in active women has shown me that the right application is key for getting results.
Understanding Kinesio Tape for Ankle Support

What is Kinesiology Tape and How Does It Work?
Unlike rigid athletic tape, kinesiology tape is a flexible tape that moves with you. When applied with a slight stretch, it gently lifts the skin from the deeper tissues. This lifting action is thought to create microscopic space, which helps in several ways:
Increases Circulation: It improves blood flow and lymphatic drainage, helping to deliver nutrients and remove waste products from the injured area.
Reduces Pressure: This tissue decompression can relieve pressure on pain receptors, often leading to a reduction in pain.
Improves Proprioception: The tape provides constant sensory feedback to your brain about your ankle's position, which can help prevent re-injury by improving your body's awareness and control.
Kinesiology tape provides support while allowing your ankle to move through its full range of motion. For a deeper look at these mechanisms, see our guide on What is Kinesio Tape and How Does it Work?.
Benefits for Ankle Sprains and Instability
At ChiroHer, I've seen kinesiology tape provide relief for both fresh sprains and chronic instability. Key benefits include:
Pain Relief: Many patients report a decrease in throbbing pain within hours of application, which is helpful in the first few days after a sprain.
Swelling Reduction: By promoting lymphatic drainage, the tape helps reduce the excess fluid that builds up after an injury, which can speed up healing.
Ligament Support: The tape acts as an external support system for damaged ligaments, like the anterior talofibular and calcaneofibular ligaments commonly injured in a rolled ankle.
Improved Stability: The feeling of support can give patients the confidence to start moving again, which is important for rehabilitation.
Maintained Mobility: Unlike rigid tape, it allows you to continue with gentle activities and exercises, preventing stiffness.
Kinesiology tape is most effective as part of a complete treatment plan. For more on managing sports injuries, visit our guide on Common Sports Injuries. While scientific research on Kinesio Tape for ankle sprains is ongoing, its practical benefits are clear when applied correctly.
How to Kinesio Tape an Ankle: A Step-by-Step Guide
Proper application is key to getting effective support. Most taping failures I see at ChiroHer come from skipping preparation or rushing the process. The tape must work with your body, so correct positioning and tension are vital.
Preparation: Before You Apply the Tape
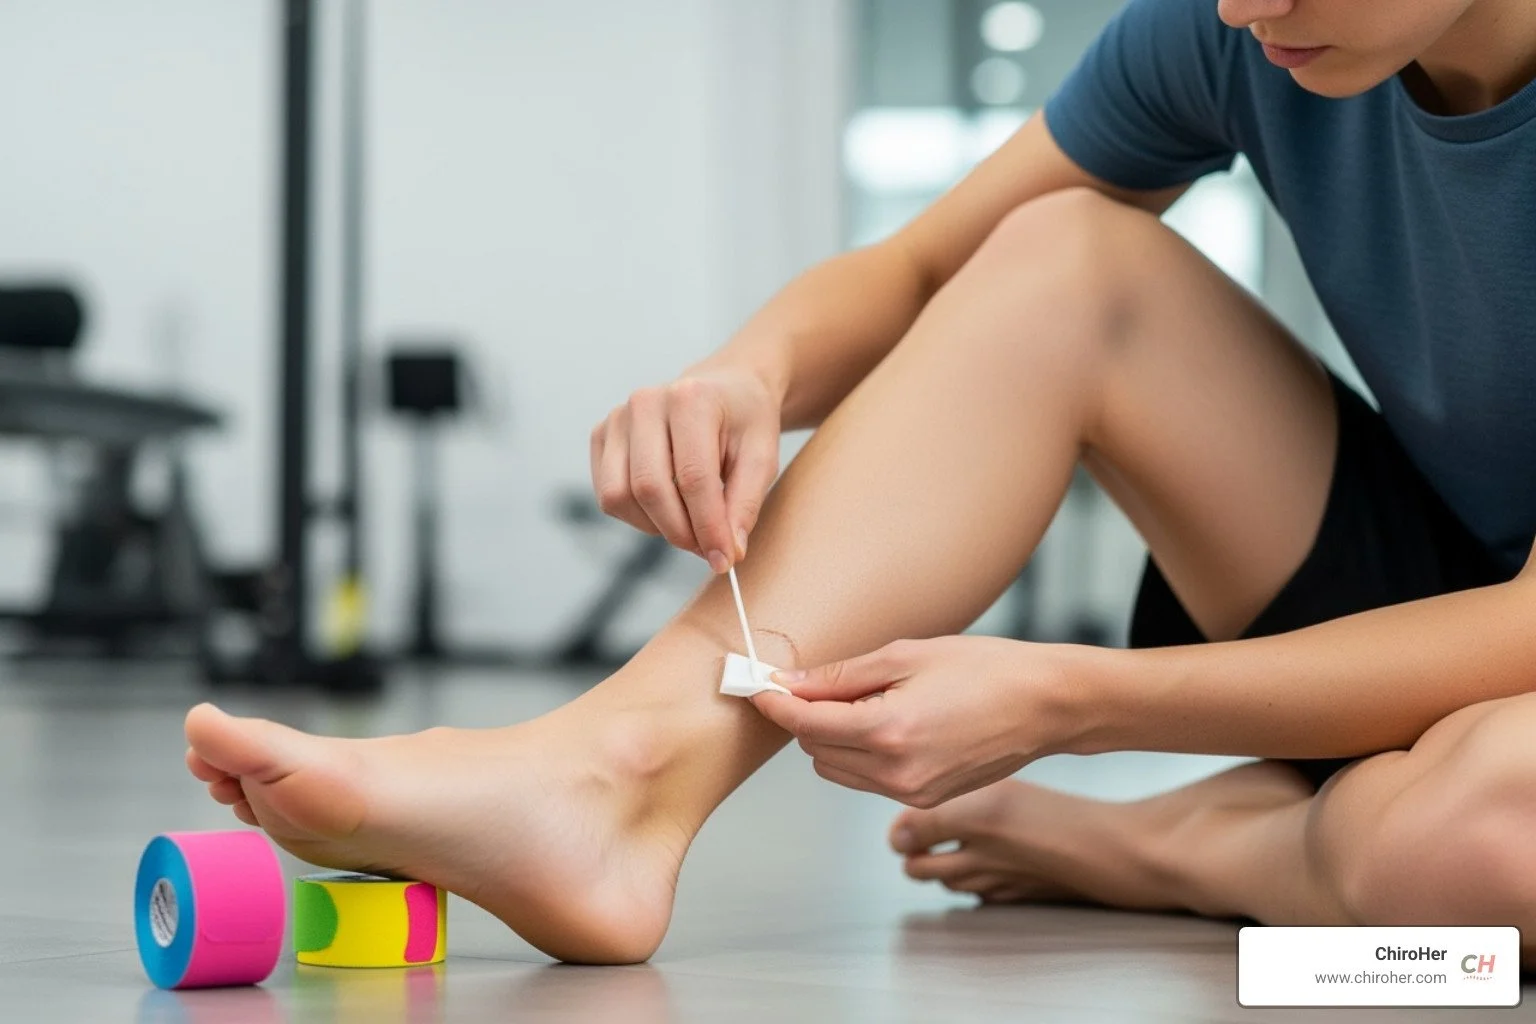
Good preparation helps the tape last for days. Before you begin, gather your supplies: kinesiology tape, sharp scissors, and rubbing alcohol.
Clean and Dry Skin: Use rubbing alcohol to clean the ankle area of any oils or lotions. Let the skin dry completely.
Trim Hair: If you have hair on your ankle or lower leg, trim it short to ensure good adhesion and make removal less painful.
Round the Edges: Cut the corners of your tape strips into a rounded shape. This prevents the edges from catching on clothing and peeling.
Measure First: Measure the tape strips against your ankle before cutting to ensure you have the right length.
A Simple Taping Technique for General Ankle Stability

This stirrup technique is ideal for general support, mild discomfort, or chronic instability. Always keep your foot at a 90-degree angle during application.
First Stirrup Strip: Anchor a 2-inch end of the tape with no stretch on the inside of your heel. Apply the tape with 50% stretch as you guide it under your foot and up the outside of your ankle. Lay down the final 2 inches with no stretch.
Second Support Strip: Anchor a new strip on the inside arch of your foot. With 50% stretch, wrap it around your heel and under your arch to create a supportive base.
Activate Adhesive: After applying each strip, rub it firmly to activate the heat-sensitive adhesive.
A Supportive Taping Technique for Acute Ankle Sprains
For an acute lateral ankle sprain, this figure-eight technique targets the injured outer ligaments. Keep your foot at a 90-degree angle.
Vertical Support Strip: Anchor the tape 4-6 inches above your outer ankle bone with no stretch. Bring the tape down and under your heel like a stirrup, applying 25-50% tension over the injured area. Anchor the other end with no stretch.
Horizontal Lock Strip: Wrap a strip around your ankle at the level of the ankle bones with 25% tension. This helps prevent excessive side-to-side movement.
Figure-Eight Reinforcement: Start at your outer ankle bone, wrap the tape under your foot, and cross it up over your inner ankle bone. Apply more stretch as you cross over the injured areas, but always start and end each strip with no stretch.
This method creates a supportive structure that protects healing ligaments while allowing for necessary movement.
Maximizing Results and Staying Safe
Once you know how to kinesio tape an ankle, proper care will ensure you get the most from it. It's also important to know when to seek professional help.
Best Practices for Wearing and Removing Your Tape
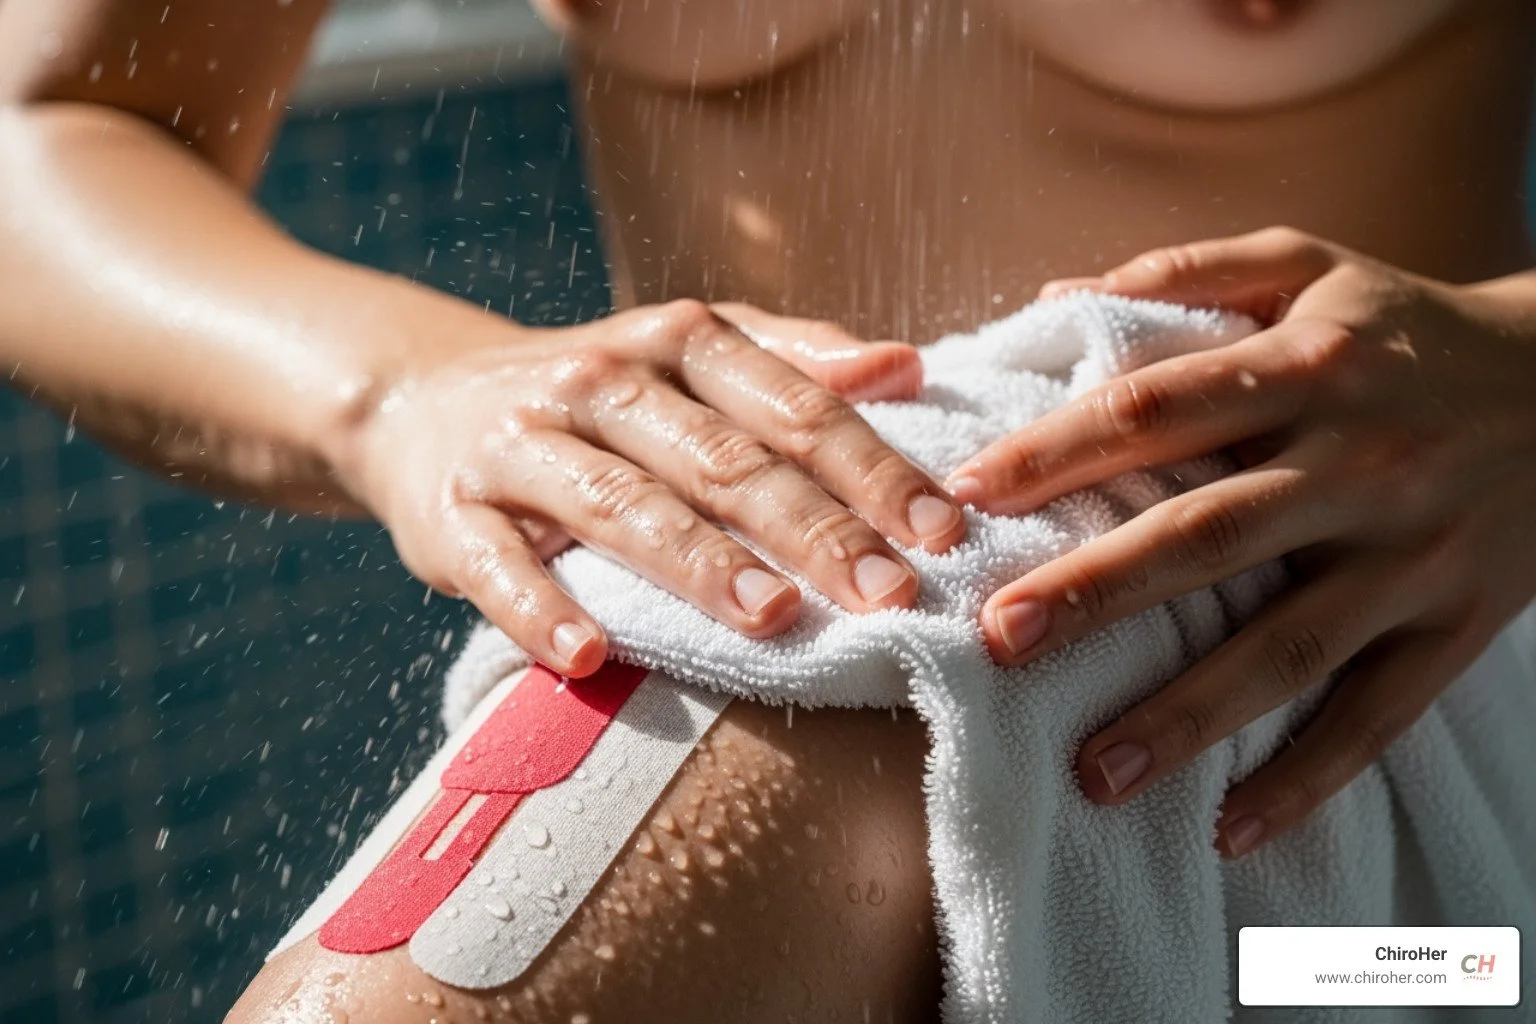
Wear Time: Kinesiology tape can be worn for 3-5 days. The strongest benefits are typically felt within the first 24-48 hours. Give your skin a break between applications.
Water Exposure: Showering and swimming are fine. Afterward, gently pat the tape dry with a towel instead of rubbing it.
Safe Removal: To remove the tape, soak it with an oil-based product (like baby oil or olive oil) for 10-20 minutes. Peel it off slowly in the direction of hair growth, rolling it away from the skin.
For more guidance on taping techniques, explore our Supportive Taping page.
When Professional Help Is Needed
Kinesiology tape is a tool, not a cure. Contact your healthcare provider if you experience any of the following:
Severe pain, excessive swelling, or significant bruising.
Inability to bear weight on your ankle.
Numbness or tingling in your foot or ankle.
A feeling of extreme instability or your ankle frequently giving way.
A rash, skin irritation, or known allergy to adhesives.
Never apply tape over open wounds or infected skin. If you have a history of blood clots, are on blood thinners, or have other medical conditions, consult your doctor before use.
Understanding What Tape Can and Cannot Do
Kinesiology tape is best viewed as a supportive tool. While it can offer short-term pain relief, research shows it has limited benefits for long-term recovery compared to other treatments. It allows for a full range of motion, unlike rigid athletic tape which restricts movement. For severe instability, an ankle brace may offer better support.
The most effective approach combines kinesiology tape with a structured rehabilitation program that includes targeted exercises. It works best as part of a comprehensive plan, not as a standalone solution for significant ankle injuries.
Building Trust: Authority and Research
At ChiroHer, we base our recommendations on solid research and clinical experience. Understanding the science behind how to kinesio tape an ankle helps achieve the best results.
Research on kinesiology tape for ankle injuries shows mixed but promising results. A systematic review on PubMed found that while the tape can provide short-term pain relief and may reduce swelling, its long-term benefits are more limited.
This aligns with what we see in our clinic. Patients often report feeling more confident and stable with the tape on, which is a significant psychological benefit during recovery. The strongest evidence supports the tape's ability to provide proprioceptive feedback, improving your brain's awareness of your ankle's position.
We are honest with our patients that kinesiology tape works best as part of a comprehensive treatment plan. At ChiroHer, we combine taping with other evidence-based treatments to support your recovery, including:
Targeted exercises
Manual therapy
Other personalized treatments
This guide is for informational purposes and is not a substitute for already established medical advice from your healthcare provider.